Hourly Revenue Management

Hourly Revenue Management


Contents:

ITM Platform’s Hourly Revenue Management feature enables automatic revenue calculation based on hours. This feature applies to both services and projects, offering flexibility in how revenues are estimated and billed.

Key concepts include:

  • Revenue Management: Overarching functionality for handling revenue, including Revenue Recognition.
  • Manual Revenue: Revenue manually added, without calculations.
  • Hourly Revenue: Calculated based on estimated or actual hours worked.
  • Non-billable hours: Time logged by users that doesn’t generate revenue.
  • Professional Category Override: A professional category that can be assigned to a user on a task instead of their default professional category.
 

Hourly Revenue


Hourly Revenue automates the process of generating revenue based on estimated or actual hours worked on a project or service. It enhances revenue management by allowing the user to switch between billing for tasks or resources while incorporating non-billable hours when necessary.


Key Concepts:


  • Estimated Hours: Used to predict revenues before actual work is completed.
  • Actual Hours: Reflects the actual effort spent and adjusts the revenue accordingly.

Project Configuration for Hourly Revenue


To enable hourly revenue for a project, follow these steps in the project’s General page:


  • Enable Revenue: This must be turned on for the project. If the actual revenue method is based on tasks or resources and revenues have already been created, this option will lock in and prevent future changes.


  • Select Actual Revenue Method: Choose between:
    • Manual Only: Requires manual input of amounts.
    • Based on Completed Tasks: Automatically calculates revenue based on completed tasks on the selected period.
    • Based on Resources: Calculates revenue based on hours logged by individual resources during the selected period.

After hourly revenue is generated, the method cannot be changed.

  • Estimated vs. Actual Hours: These options will be enabled if hourly revenue is based on tasks or resources. They set the default option when creating revenue.
  • Allow Changing per Revenue: This option permits the user who creates the revenue to choose between Estimated or Actual hours for that specific revenue entry.
  • Allow Users to Add Non-billing Hours: If this box is checked, users with permission can log non-billable hours for the project, with the effect that these hours are excluded from hourly revenue calculations.

Hourly Revenue Creation

The process of creating hourly revenue depends on whether the project is configured for tasks or resources:

  • Navigate to the Revenue section.
  • Click Create Hourly Revenue.
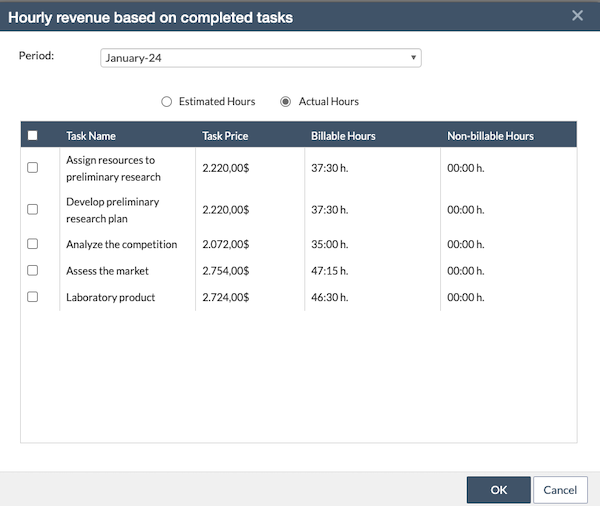
  • A popup will appear based on the project’s configuration, showing either completed tasks or resources for the selected period.
  • Select the billing month. If the project configuration allows, choose between Estimated or Actual hours.
  • Previously billed tasks or resources will be marked and cannot be billed again.

Billing Calculations

  • Based on Completed Tasks:
    • Estimated hours: Task price is calculated from the project category bill rate multiplied by the estimated hours for each task.
    • Actual hours: Task price is based on the project category rate, multiplied by the actual hours worked (excluding non-billable hours).
  • Based on Resources:
    • Estimated hours: Multiply the estimated hours logged by each user by the project category rate (applied to employees or providers).
    • Actual hours: The same calculation applies to actual hours worked, excluding non-billable hours.

Assigning a Different Billing Category to a Task-User Assignment

To assign a different billing category to a user for a specific task:

  • Go to the Effort tab of the task.
  • In the Assign by Team Member section, a Billing Category column is available for each user. Initially, it matches their professional category.
  • Change the billing category for the task if necessary.

Non-billable Hours

Non-billable hours allow users to log time that will not be included in hourly revenue calculations when using Actual Hours.

Steps to enable non-billable hours:

  • Ensure the project has Allow Users to Add Non-billing Hours enabled.
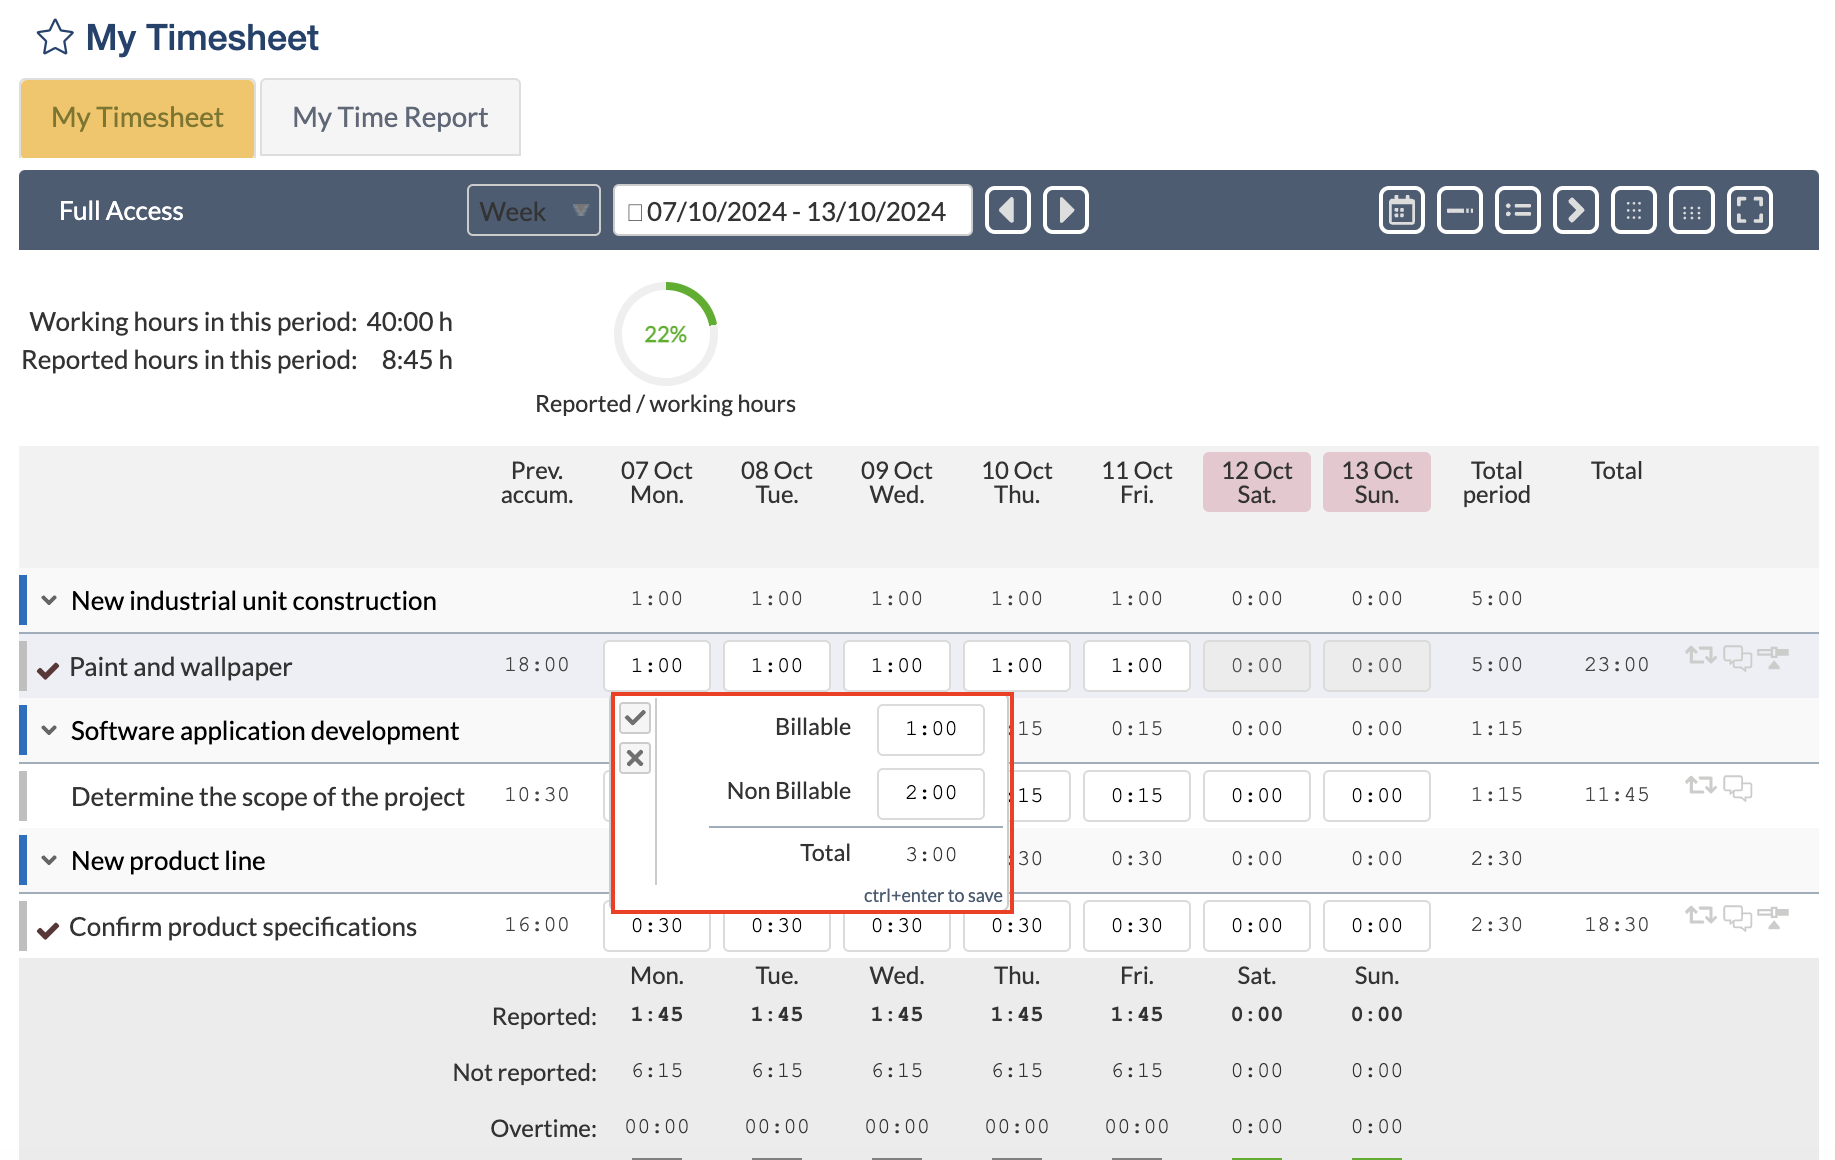
  • Users with this permission will see options to log both billable and non-billable hours in the timesheet for each task.
  • Users can add notes about the logged hours in the Comments section.

Configuration and Parameters


Non-Billable Hours Parameters

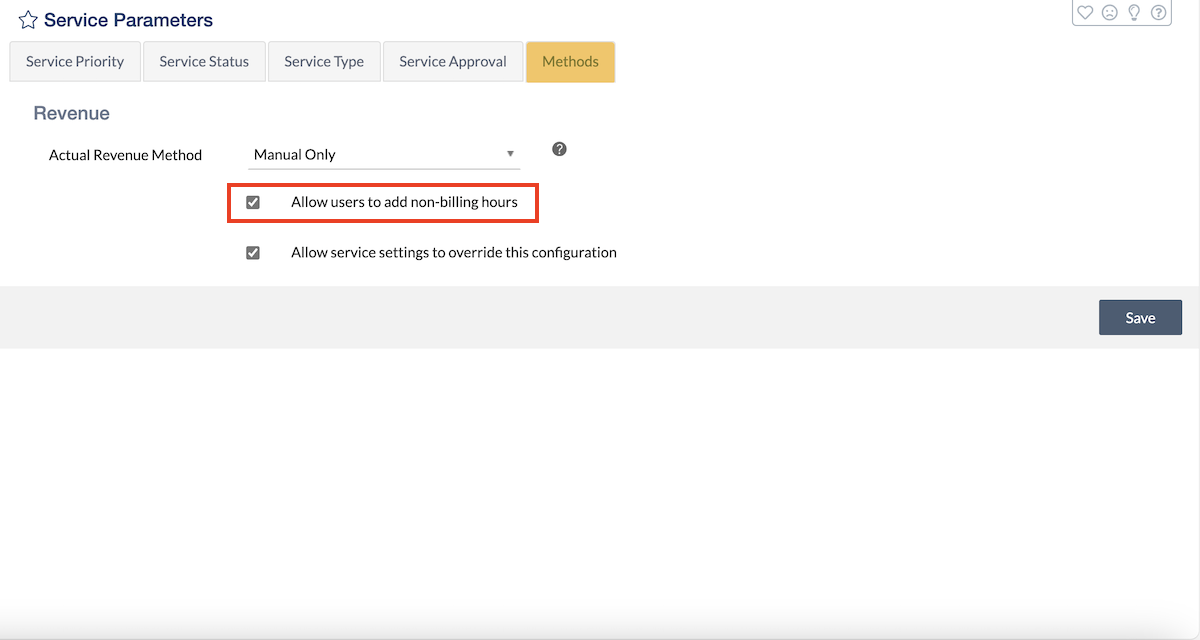
To allow users to log non-billable hours in their projects and services, this functionality must be enabled in your environment, both in project revenue models and service models.

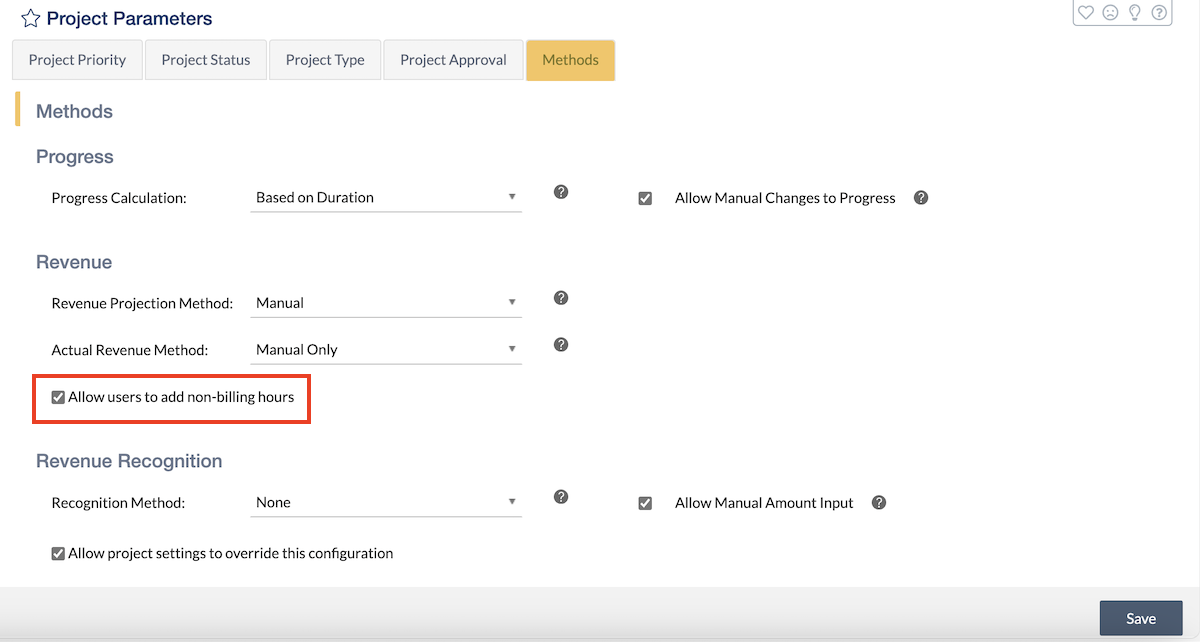
To do this, go to Configuration > Parameters > Project / Service Parameters > Methods, and select Allow users to add non-billable hours.

To enable non-billable hours for a specific project or service type, go to Configuration > Project / Service Parameters > Project / Service Type and select Allow users to add non-billable hours.

This configuration provides control over which types of projects and services allow non-billable hours, making it easy to make updates as your needs change.

Project and Service Parameters

The Project and Service Parameters sections allow administrators to define default methods for calculating hourly revenue. These settings are structured into two main areas:


Methods Tab:
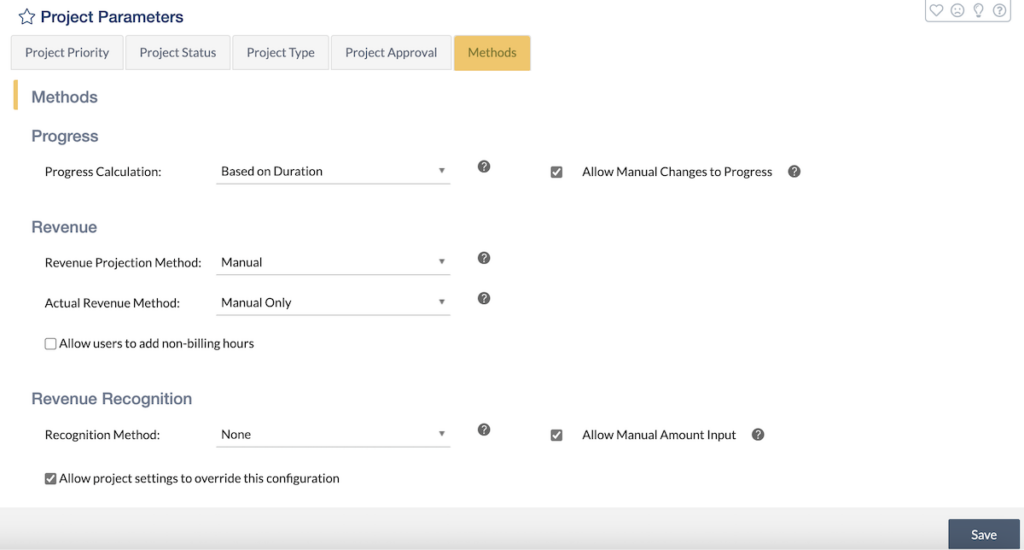
Project Parameters - Methods


  • This tab provides options for setting company-level defaults, such as:
    • Actual Revenue Method: Set to “Hourly Based on Completed Tasks.”
    • Non-billable Hours: Enable globally to account for time that should not be billed.
    • Override Option: Allow project or service managers to override company-wide configurations by selecting “Allow project/service settings to override this configuration.”


Project/Service Type:
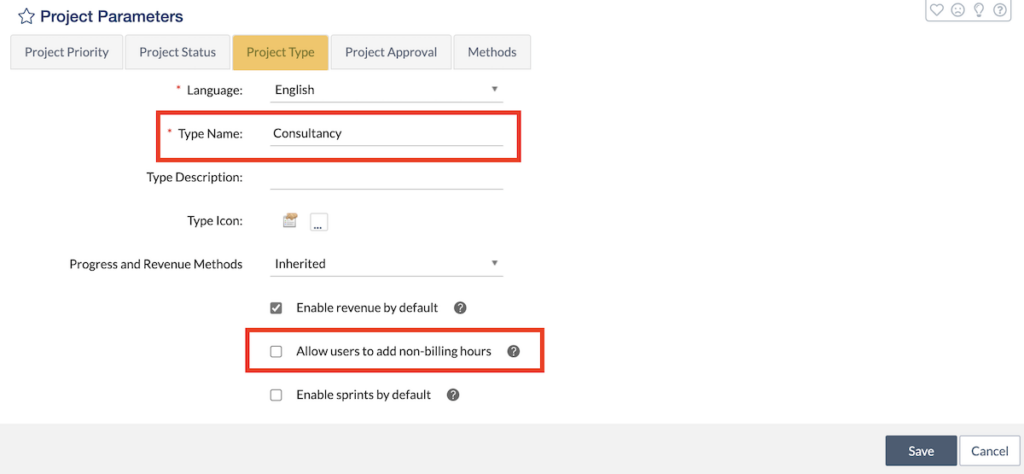
Project Type - Consultancy


  • Different configurations can be applied depending on the type of project or service. For example:
    • Transformation Projects: May not require revenue tracking.
    • Consultancy Projects: Often require hourly billing.
    • Construction Projects: Might use task-based billing. Each project/service type can either inherit company-level methods or customize them to fit specific needs.

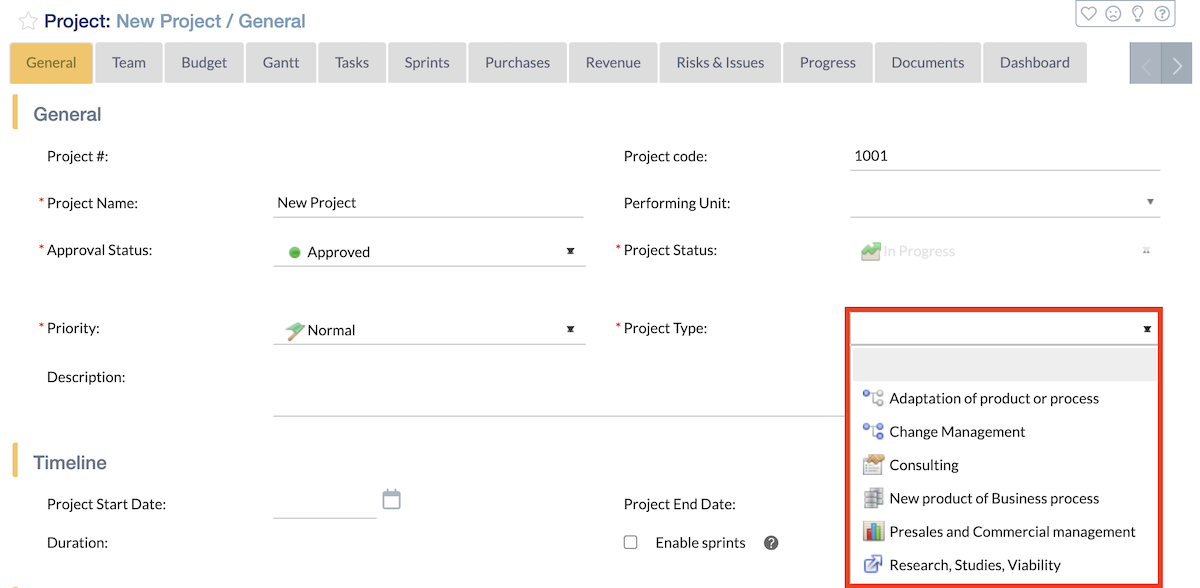
Project types are visible in the ‘General’ tab of each project:

Hourly revenue management allows you to precisely control and optimize your revenue streams, ensuring that each task and resource contributes transparently and measurably to project profitability.


Related Articles:


Revenue Projection Method

Revenue Projection Method

When you create revenue, you can fill in the revenue projected amount within the “Revenue Projection” section. This value will be displayed within the application regardless of the revenue status and can be used to compare the projected amount with the actual amount.

You can configure how the revenue projected amount will be filled in:

  • Manual: the projected amount will be typed. The currency can be changed to any of the enabled currencies
  • Based on completed tasks: The projected revenue amount will be based on the tasks completed per period. Users will be presented with a pop-up to select which tasks to include.
    Each task will add its value, which is calculated multiplying the estimated hours by the bill rate of the categories involved


Configuration

 There are three locations where you can set your preferences for revenue projected amount, from a higher level to the project itself:

For the whole company, in Configuration Configuration

  1.  Project Parameters → Methods.
  2. By project type, in Configuration → Project Parameters → Project Type.
  3. By project, in the General section of the project. This option will only be available if the option “Allow project settings to override this configuration” was ticked at the company level

At any of those levels, you will be able to set your preference for the way revenue projected amount is filled in

Revenue Recognition

Introduction to Revenue Recognition

Revenue Recognition is part of the Project Revenue Management feature in ITM Platform, which includes plan revenue, recognize revenue, actual revenue processing, and perform project account closure and financial analysis within the project life cycle.

Revenue recognition is an accounting principle that identifies the specific conditions in which revenue is recognized. The revenue recognition concept is part of accrual accounting and establishes that revenue should be recorded when it has been earned, not received.

Revenue versus cash timing:

  • Accrued revenues are used for transactions in which goods and services have been provided, but cash has not yet been received.
  • Deferred revenues reflect situations in which money has been received, but goods and services have not been provided.

Recognition principles are extensively outlined in IFRS and U.S. GAAP.

ITM Platform provides the following project revenue recognition methods.

  • Percentage-of-completion
  • Linear Distribution by Milestones
  • Fixed Price per Period
  • Bill Rate per Estimated Hours
  • Direct Revenue Recognition

The revenue recognition feature will distribute the total project revenue budget within the different periods of the project. Each method will use different formulas to calculate revenue recognition for each period.

You can choose to apply the same method for all projects in your company, specify a method per project type, or specify the method project by project. Before describing each of the methods, let us clarify the concepts of periods, actuals, forecast, amounts, percentages, how they apply to projects and how they affect revenue recognition.

Periods

Intuitively, you can tell a period is a range of time between two dates. ITM Platform identifies periods as days, weeks, or months. Months are more generally used for accounting and financial analysis purposes.

When a project is created, so are the periods. For example, say a project starts on November 15th and ends on February 10th. It will have four periods: November, December, January, and February.

Whenever a Revenue Recognition is made, it will apply to one period. Therefore, you will be able to recognize revenue for each month, using the method of your choosing.

Actuals and forecast

When you select a revenue recognition method, establish a revenue budget, and set the project start and end dates, the system will automatically create a forecasted revenue recognition per period.

Forecasted revenue recognition is the expected revenue recognition for a future period. The forecast can use the revenue recognition method applied to the project or, if you configure it that way, it can just make a homogeneous distribution along all periods.

Once forecasts have been calculated, you can create an actual revenue recognition, starting with the first period.

Actual revenue recognition is usually applied to past periods and represents the revenue that has been recognized.

Amounts and percentages

Whenever revenue recognition is made, it will generate four relevant values per period: amount and percentage both for the period and accumulated to the project.

Let’s see an example:

The project has a revenue budget of 100,000 $ and has four periods. Let us assume each period will have the same revenue recognition of 25,000 $ each.

  • Revenue recognition amount for the period: the amount of money recognized on the period. In our example, this will be 25,000 $.
  • Accumulated revenue recognition amount: the amount of money recognized from the beginning of the project until that period. On the third period, it will be 75,000$
  • Revenue recognition percentage for the period: the proportion of the revenue recognition amount for the period over the total revenue budget. In our case, 25%
  • Accumulated revenue recognition percentage: the proportion of the accumulated revenue recognition amount for that period over the total revenue budget. On the third period, it will be 75%


Revenue Recognition Methods


Percentage-of-completion

This method calculates revenue recognition multiplying the project progress during the period by the total revenue budget.

Linear Distribution by Milestones

This method is based on “Revenue Milestones”. The value of each milestone is the proportion of its estimated hours within the project, multiplied by the total revenue budget

As opposed to the percentage-of-completion method, each milestone will consider a linear distribution of progress along time and will apply that percentage to-date to the milestone value, regardless of the progress reported.

To use this model, you need to create “Revenue Milestones” within the project plan. They are created equal to regular milestones but should also be marked as “Revenue Milestone” within the milestone’s general tab.

In the Gantt Chart, you should then set the milestone’s dependencies with the task you want to use in the revenue recognition of each revenue milestone. To include multiple tasks in the milestone’s revenue recognition, you have to create a summary task with those tasks and establish the dependency between the summary task and the milestone.

Fixed Price per Period

This method will divide the total revenue budget by the number of periods within the project, applying the same revenue recognition amount per period.

Bill Rate per Estimated Hours

This method recognizes the revenue as the result of multiplying the bill rate per professional category by the estimated hours of each task, factoring in the progress task as the proportion for that period.

Direct Revenue Recognition

This method recognizes all revenue, regardless of their status.


Getting Started with Revenue Recognition

Configuration


There are three locations where you can set your preferences for revenue recognition, from a higher level to the project itself:

  1. For the whole company, in Configuration → Project Parameters → Methods
  2. By project type, in Configuration → Project Parameters → Project Type.
  3. By project, in the General section of the project. This option will only be available if the option “Allow project settings to override this configuration” was ticked at the company level

Regardless of the level at which you configured the settings, these are the options you can configure:

  • Revenue Recognition Method: any of the methods offered by ITM Platform.
  • Forecast Recognition Method: use the same as Revenue Recognition Method or create a linear distribution over the future periods.
  • Revenue Recognition Periods: Months or weeks.
  • Whether the actual revenue recognition amount can be manually changed or not.

Project requirements to work with revenue recognition


Once you have chosen the options that best meet your needs, make sure your project has the necessary information:

  • Your project has both start and end dates. Otherwise, the system will not be able to create the periods.
  • Your project has a total revenue budget. You can set this value in the Budget section of the project, clicking on the “Edit Top-Down Budget” button.

Accessing the revenue recognition feature


If your project meets the requirements, it will show a new “Revenue Recognition” section under “Revenue”

There are two main subsections on this page:

  • Summary, which provides with condensed and graphical data about the current revenue recognition status
  • Revenue Recognition Periods, which will display a list of all actual and forecasted revenue recognition periods

The button “Add New Revenue Recognition” button will convert the next forecasted revenue recognition into actual revenue recognition.

You will be able to add a description and, if it was configured that way, change the period amount.

Once you save, the line will turn into actual revenue recognition, and the next forecasted period will be next to become actual.

Actual revenue recognitions can be deleted from the list in the reverse order they were created. A user with enough permissions can lock actual revenue recognition lines, so they cannot be changed or deleted.