Resource planning
Index
- Introduction
- Resource planning for project managers
- Resource planning for program and portfolio managers
- Selecting a period
- Demand Overview
- Resource Allocation
Introduction
The main purpose of the resource management area is to give full access users an integrated overview that combines:
- all resources needed on projects and their underlying tasks
- the capacity of those resources.
Since the two views can show conflicts between the demand asked for by project managers and the availability of resources, the resource management area also offers the project intelligence to address those problems:
- Total demand needed for a project. You can drill down to each task and professional profile to see the detail you need.
- Available capacity for each profile. You can drill down to individual resources.
- Gaps between demand and allocated resources are marked in red for easy identification
- Underallocations of a professional category or individual resource are marked in green, to identify resources with high availability
Resource planning for project managers
There are two ways project managers can assign team members to the project and its tasks:
- In the team control section of the project area
- In the team section of a task, for each individual task.

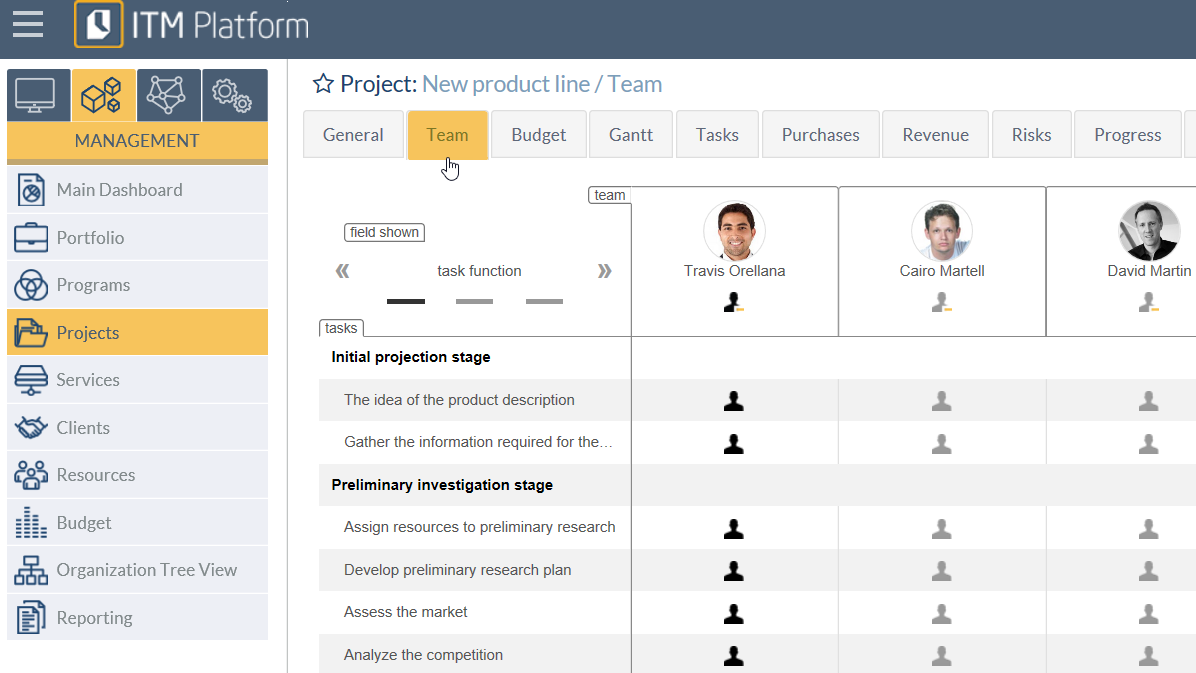
Team control view
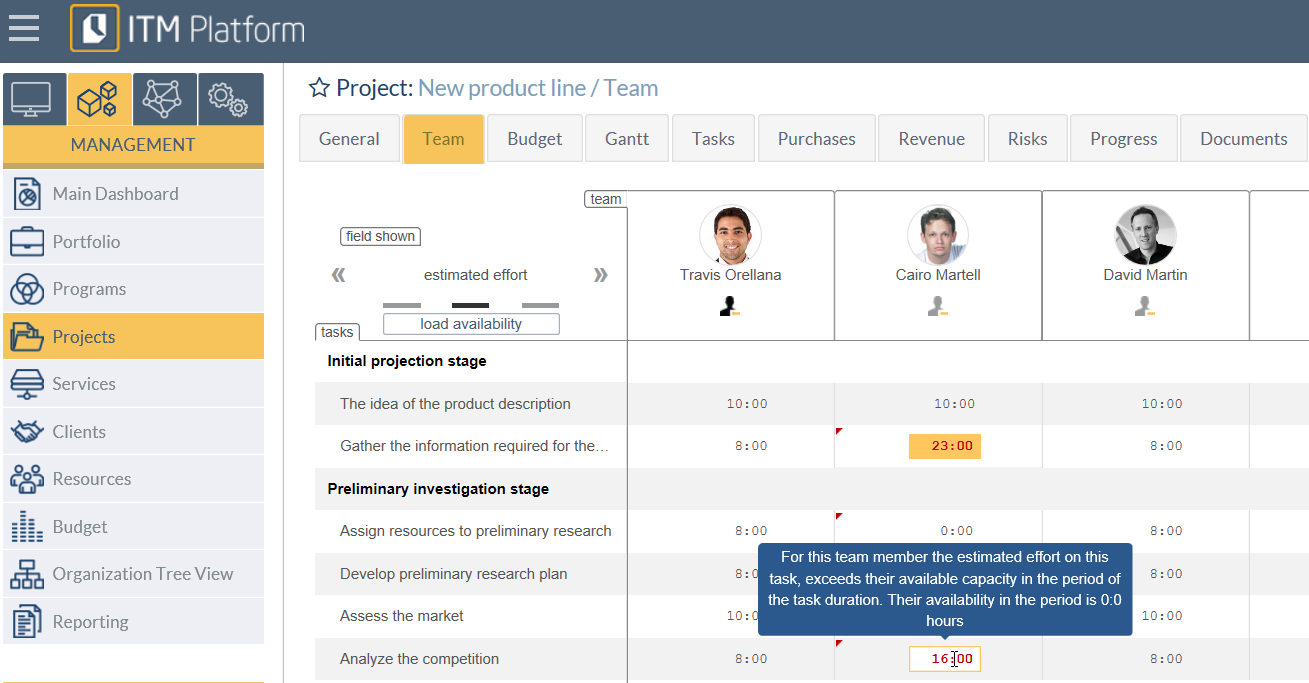
It can occur that a project manager assigns a task to a team member who is on holiday during the duration of the task.
To identify these cases, the sign ![]() is shown next to the resource. This is shown for each individual task, since each task has its own duration.
is shown next to the resource. This is shown for each individual task, since each task has its own duration.
To see if the holidays of the team member cause any capacity problem for a task, the project manager can go to the estimated effort view of the team control. Any estimated effort marked in orange/red indicate an overallocation of the resource for that task. By hovering the mouse over the estimated effort, the project manager can check the exact available capacity in the period.![]()
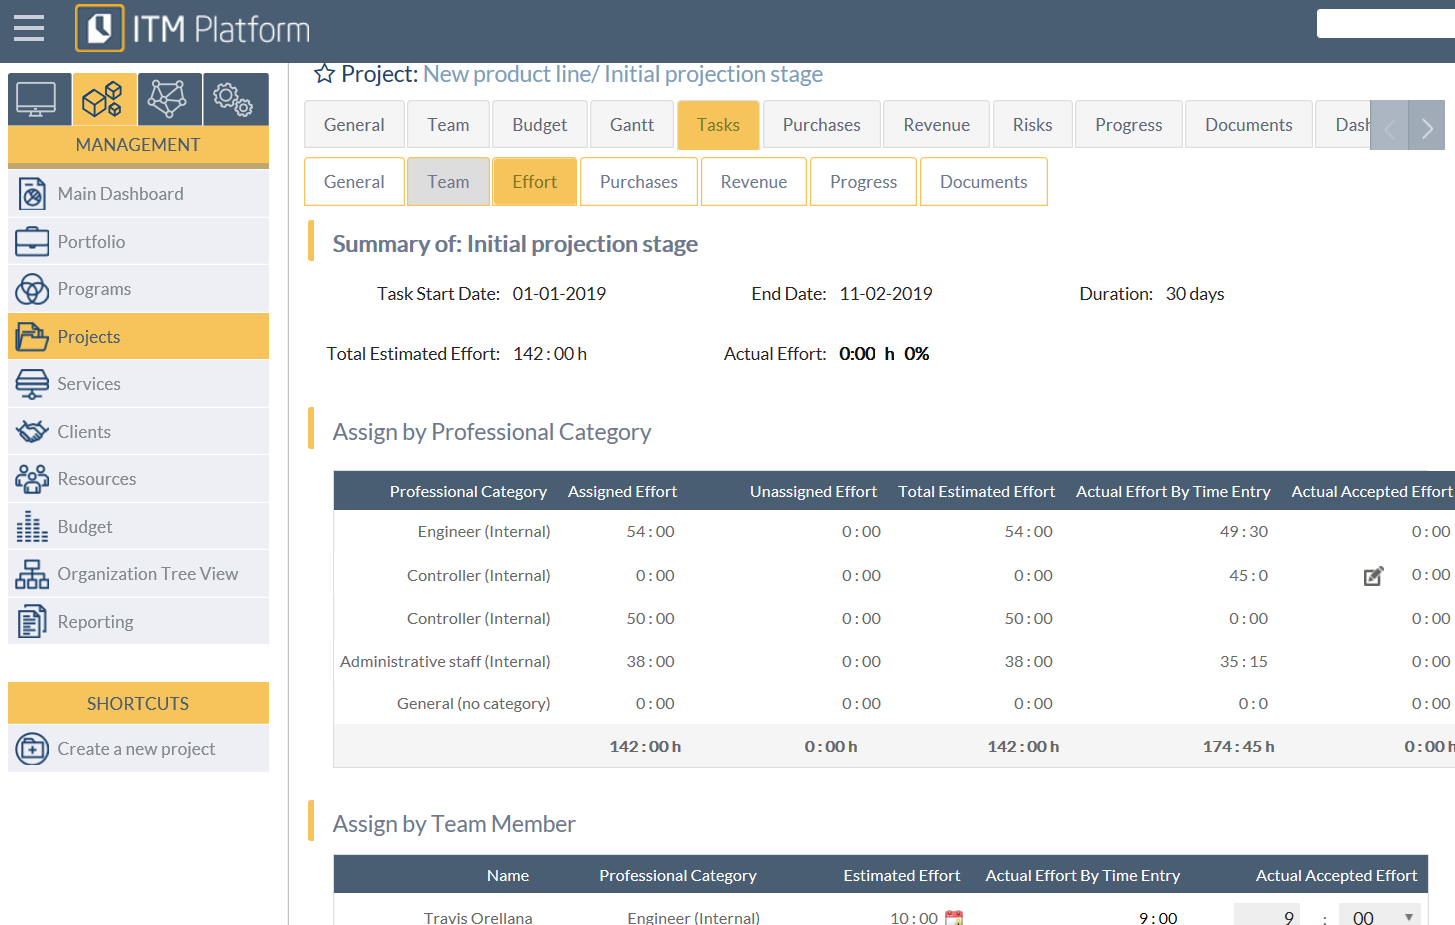
The team control is used to assign individual team members, but in certain cases instead of assigning individual resources, a project manager will want to plan the tasks by professional categories, for example by specifying the need for a senior analyst or technical architect. For this purpose, they use the effort subsection of a task.
In this screen, the upper section shows the assigned and unassigned effort for each professional category, while the lower section shows the estimated effort per assigned team member.
Resource planning for program and portfolio managers
While the above methods are enough for project managers, they lack an overview over all projects at the organization level. Whenever a team member is available to work full time on a task of one project manager, if another project manager is assigning the same team member on another task, a conflict may ensue.
Full access users, typically PMOs, program and portfolio managers, can leverage more powerful resource planning. To facilitate the resolution of these conflicts, the resource management area gives the full overview of demand and capacity over all projects:
- The demand on a project or task represents the total effort planned by the project manager as in the team control section or task area, including both assigned and unassigned efforts
- The capacity of a professional category and its underlying individual resources is the sum of their working hours in the period
- The allocated hours are the sum of all estimated efforts already assigned by the project managers in the team control or task screen.
Note: The calculation of the capacity per professional category already takes into account the holidays of all individual resources.
The resource management screen is divided in three sections:
- period selection/filter
- demand section
- resource allocation section
Note: The upper and lower level panel are designed to display the same period.
Note: By using the horizontal scroll bar, both panels will scroll horizontally. This allows you to always have an integrated view of the project demand and allocated resource capacity in the same period.
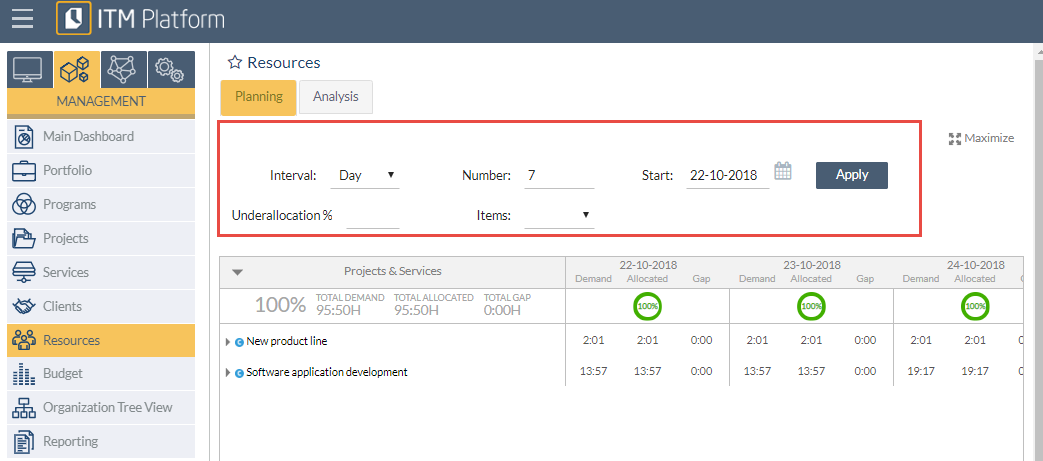
Selecting a period
The top of the screen includes the filters to set the range of the date you want to view on the resources screen. The demand and capacity can be viewed in four different intervals: day, week, month and quarter.
Note: The maximum number of intervals is 31 for days, weeks and months and 8 for quarters.
By selecting the start date you set at which day the first interval should start. To apply these settings, click the Apply button.![]()
The Underallocation % field allows to set the threshold that will highlight in green the underallocation of resources in the below panel of the screen.
Example: If the total capacity of a resource in a period is 100 hours and 60 hours have been allocated, they will have a 40 percent underallocation. By setting the “Underallocation %” field to 35, the availability will be highlighted in green.
Finally, the field on the far right is used to set the number of rows you wish to display in each section.![]()
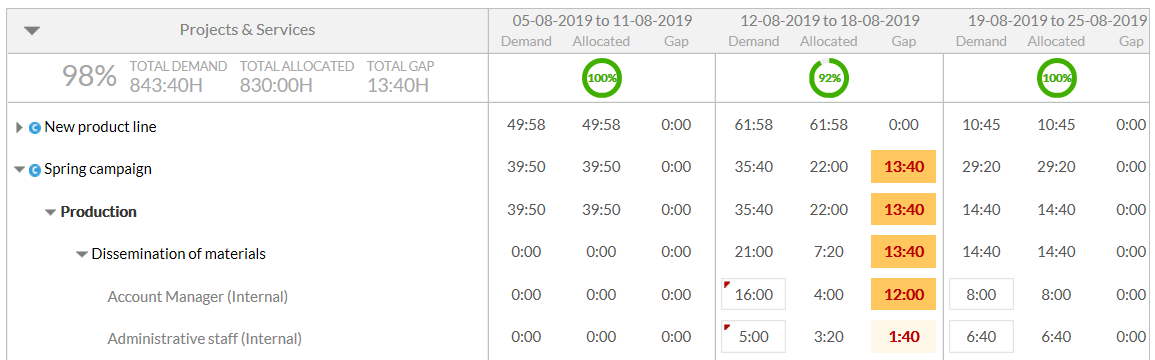
Demand Overview
Just below the header of the section in the first column, the percentage, total demand, total allocated and the total gap for the selected period are shown:
- The percentage shows the amount of demand already allocated to resources

- The total demand refers to the total number of hours needed in the period

- The total allocated refers to the total number of hours allocated in the period

- The total gap is the difference between total demand and total allocated in the period

The percentage above each period interval column shows the amount of demand already allocated to resources in that interval. Within the column, demand, allocated hours and gap for each project, task and professional category are shown.

Resource Management: Column header with main indicators
When loading the resource management screen, most of the information is collapsed: the demand section shows all projects and services with demand in that period.
Note: The preceding icons C, K and S indicate a Waterfall Project, an Agile Project or a Service.

Each project can be expanded by clicking the preceding arrow, which will drill the project down to the underlying tasks. By clicking the arrow that precedes the task, you will further drill down to see each professional category that is needed/assigned to the task.
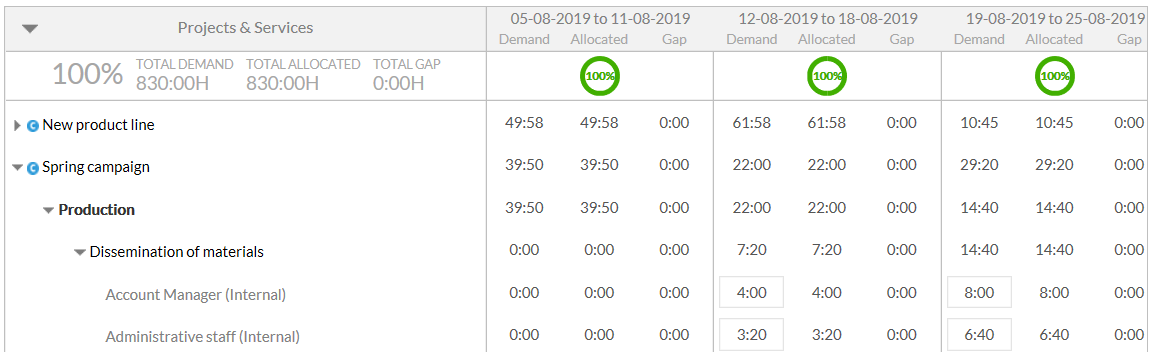
Projects or tasks that have a gap, meaning that the number of allocated hours is less than the demand, are marked in red numbers with a light orange background when the gap is less than 10 hours, or in red numbers with a dark yellow background when the gap is more than 10 hours.
There are various methods to resolve gaps:
- Go to the professional category (or categories) that cause the gap and assign more hours of already assigned resources. See the Resource Allocation paragraph of this article for more detail. In the demand section, you can click on the professional category with the gap to jump to that professional category in the resource allocation section.
- Reduce demand. As the demand was determined by the project manager you may want to agree it with them.
- Change the duration of the task. This can be done in the menu in the pop-up for the task.
- Add additional resources of the same professional categories. You can do this by clicking on the tools wheel right to the task and then click on add resources. When you add a resource to as task, it will show in the resource allocation section with 0 hours, where you can assign the corresponding hours. If needed, the system will add the necessary professional category to the task.
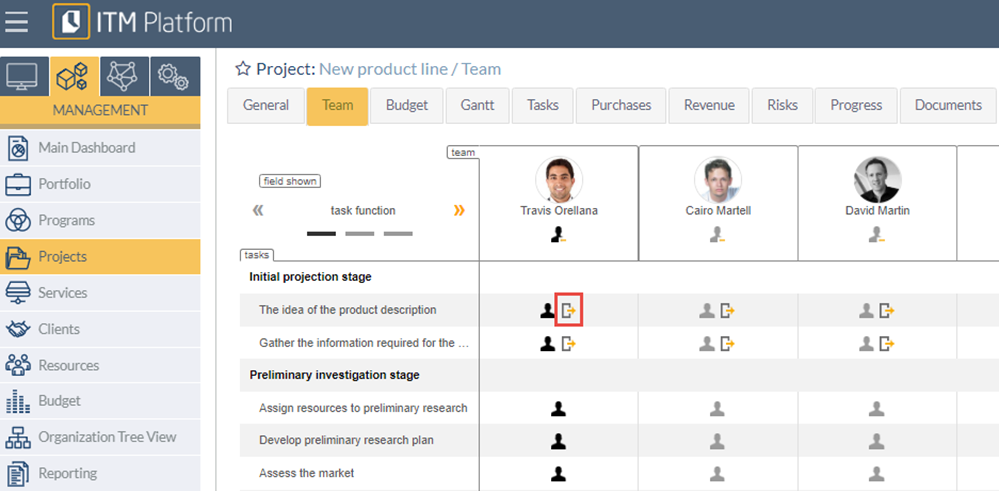
Note: The team member needs to be assigned to the project if you want to assign him to a task.
Trick: Assign the team member to a project quickly by clicking on the tools wheel right to the project.
Trick: When a team member has been assigned to the project, you can assign him to the task with the corresponding tools wheel
The resource allocation section only shows resources that have assigned hours in the selected period. If you add a resource to a task from the demand section, it will show in the resource allocation with 0 hours in each column.
Note: If you save the screen without assigning hours to a resource just added, it will disappear from the resource allocation section.
Trick: Add a placeholder hour estimation to keep the resource. We recommend adding just 1 hour.
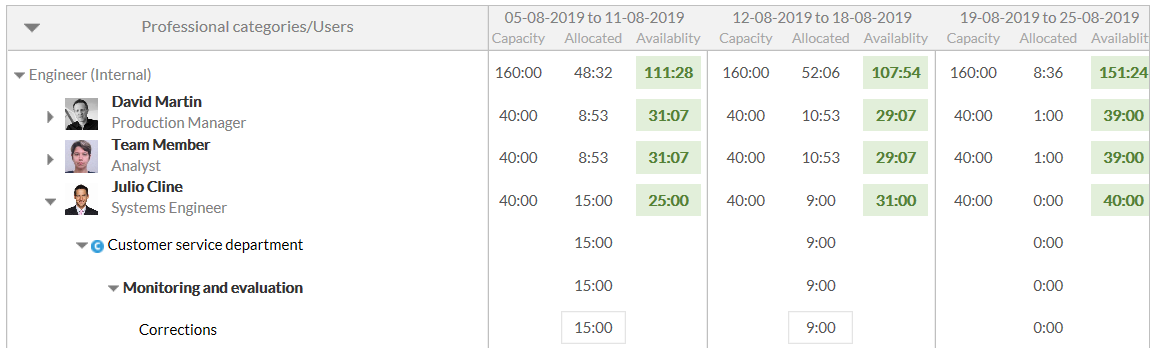
The resource allocation section shows the following information:
- Capacity: The total number of hours that either all assigned resources of a professional category or an individual team member are available, based on their working hours and calendar in the period
- Allocated: The total number of hours that all assigned resources of a professional category or an individual team member have been assigned to a project or individual task
- Availability: The difference between the capacity and allocated hours. If it is marked in yellow/red , it indicates an overallocation of the professional category or individual team member. A green highlight indicates an underallocation with the threshold that is set in the filter.
When expanded, the above information can be seen at four different levels:
- The total of all assigned resources of a professional category
- The total of all hours of an individual team member on all the projects they are assigned to

- The total of all hours on an individual project for an individual team member

- An individual task for an individual team member

Note: The only field that can be edited is the allocation of an individual task of an individual team member.
Note: Capacity values cannot be edited, as they depend on the working hours and calendar of a resource.
Note: The availability cannot be edited either, as it’s a calculated value.
When you increase the number of allocated hours of a resource, two things can happen regarding the corresponding demand:
- The total demand for the corresponding category for the task exceeds the total allocation. As a result, the overall gap on project demand will decrease. Example: The demand on the task is 4:00 h. The assigned effort is 1:00 h (so the gap is 3:00 h). If we increase the allocated hours from 1:00 to 3:00 the gap will decrease and will be 1:00 h.
- The total demand for the corresponding category for the task is less than the total allocation: the demand will be increased to make the gap exactly zero. Example: The demand on the task is 4:00, and the assigned effort is 1:00 (so the gap is 3:00 h). If we increase the allocated hours from 1:00 to 5:00 the gap will decrease and will be 0:00 h.
