How to create a calendar and include non-working days and holidays

Weekly working hours and weekend configuration

In ITM Platform, you can create different working hours and set up non-working days for each week (weekends).

Weekly working hours

In the section ORGANIZATION → USER MANAGEMENT → Working hours, you will find a default working hour setting created with eight working hours from Monday to Friday.

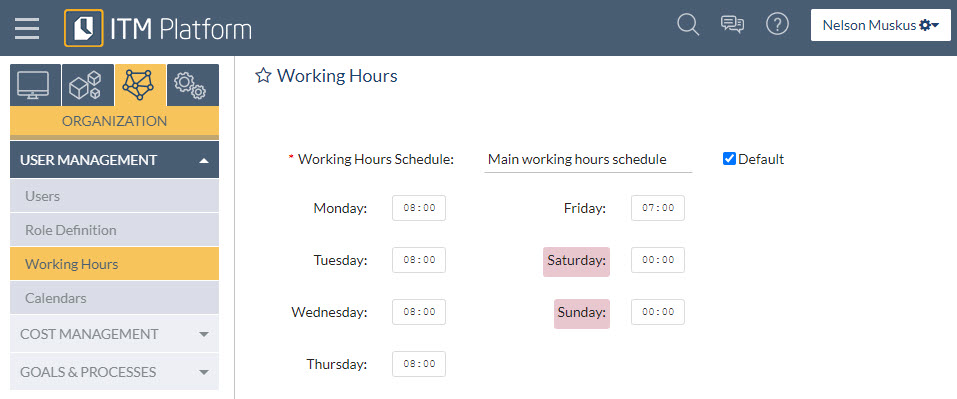
Optionally, you can create different weekly working hours configurations. For example:

  • America office (default): Monday to Friday, 8 hours daily
  • Middle East office: Sunday to Thursday, 8 hours a day
  • hird-level backup staff: Monday to Saturday, 6 hours a day

After the working hour schedules are created, you can assign them to users.

How working hour schedules affect users

Estimated hour distribution: When you assign a schedule to a user, the estimated hours for each task will be evenly distributed over their duration, proportionally to the working hours of each day. Non-working days reflected in the user’s calendar will be excluded.

For example, an estimated 10 hours assigned to a user over five days will have an projected distribution of two hours per day.

Timesheet: days of the week marked with zero hours will be marked as non-working in the timesheet.

Weekends

Days marked with zero hours in the section ORGANIZATION → USER MANAGEMENT → Working hours will be considered weekends and will be non-working.

To what weekends affect

Duration of tasks and projects: Days marked with zero hours at the default working hours schedule will be considered non-working in calculating task durations.

For example, a task that goes from Tuesday to next Monday in an organization whose default working hours schedule in the previous example is “America office” will last five days, as Saturday and Sunday are non-working.

The tasks’ duration will also take into account the non-working days indicated in the organization’s default calendar. In the previous example, if Thursday were a public holiday, the task’s duration would become four days.

Task duration is displayed in several ITM Platform sections, such as the Gantt chart, task list, project list, and reports.

Timesheet: the days of the week marked with zero hours, will be marked as non-working in the time timesheet.

Risk & Issue Management

Main concepts used in this document

  • A risk is a potential future event that could have a negative impact on a project.
  • The risk level is determined by the probability a risk will occur and the impact it will have. Both of these are parameters which can be configured.
  • By applying a mitigation plan, we reduce the probability of the risk occuring.
  • When we create a contingency plan, we do not change the probability of the risk occuring, but we plan for how to control the impact if it does so.
  • An issue is an event that affects the project. When the risk mitigation plan fails, you can escalate the risk to an issue.
  • Issues can be of different natures. ITM Platform provides for three predefined types of issue:
    • A problem, an unexpected fact that affects predictions for the project or service delivery
    • A change request, adjustment to the specifications, affecting the project deliverable
    • A bug, problem that affects the functionality of the service or product
  • Tasks affected by the risk: existing tasks jeopardized by the risk, and how: scope, budget or schedule.
  • Tasks to tackle the risk: tasks created to manage, mitigate, or act on the contingency plan.
  • Tasks affected by the issue: existing tasks affected by the issue, and how: scope, budget or schedule.
  • Tasks to tackle the issue: tasks created to solve the issue.
  • The risk or issue manager: the person in charge of monitoring the risk or dealing with the issue. Tasks to tackle risks or issues may also have their own managers and team members.
  • Issue resolution: Set of data that reflects how the issue was solved or dealt with. It includes changes in the project cost, schedule or scope.

This is a general overview of what we will explain in the next sections.

Settings

ITM Platform comes with predefined settings that allow you to start using risk and issues feature right away. If you need to change the configuration go to the CONFIGURATION menu tab, PARAMETERS section.

Risk Parameters

The most relevant section under risk parameters is on the Risk Level tab.

There you can modify the risk impact values or create new ones. For example, high, medium-high, medium-low, and low.

The second parameter is the risk probability, which, similarly to the risk impact, has values that can be customized to meet your needs.

Finally, the risk level section allows a company to define its own thresholds for the preset high, medium, and low levels. The risk level will be calculated by multiplying the impact by the probability, resulting in one of the existing risk levels.

For example, let’s assume the threshold to reach the medium risk level is 25 and high is 35. If a risk as an impact of 4 and a probability of 7, the resulting risk level will be 28. Therefore, medium.

In addition to the risk level, impact and probability, you can customize the risk status and the risk type.

Issue Parameters

The issue type will help you identify the nature of the issue – as well as classifying any changes to the costs and schedule by type. ITM Platform comes with three predefined types: change request, bug, and problem. You can add to, edit, or remove these.

The issue status allows you to determine whether it is an ongoing issue or it has been resolved. There are two predefined statuses: open and closed. You can add more types of statuses if you need. These will be used as a flag for your dashboards and reports.

Risks

Risks can be found under the ‘Risk & Issues’ section of a project, Risks subsection.

The initial layout of the risk registry will be the ‘Graph View’, which allows you to understand the risk map visually.

Here, you can edit, add or delete risks, as well as establish the impact and probability values to update the risk level dynamically.

Below the risk level indicator, there is a button that will show you the risk matrix.

On the vertical axis of the table you will see the probability displayed and on the horizontal axis, the impact. The risk level is the result of multiplying both values and is represented where the two cross.

If you select the ‘List View’ on the risk registry, all the traditional list options in ITM Platform are available, such as filtering, columns selection, or export to Excel.

The risk file

When editing a risk, you will find the following sections:

General

It allows you to classify the risk and give it a name. Also, a risk number will be provided.

Potential Impact on Project

This section holds information related to the impact the risk is likely have on the project if it materializes.

Here you will find the Risk occurrence sub-section. This allows you to indicate the potential cost variation, schedule variation in days, and a description of the potential change in scope.

The third and last subsection is Tasks Affected by this Risk, which allows you to select existing tasks that will be particularly affected by the risk. For each task, you can indicate how it will be affected: cost, budget, or scope.

Risk management

This section holds the information related to how the risk is being handled. The first part of it will allow you to select a risk manager and define both mitigation and contingency plans. You can also attach any related documents.

You can select existing Tasks to Tackle Risk or create new ones. These are specific tasks created to manage the risk and are not the ones affected by it.

In this subsection, you will also find the Total Cost of Risk Management and Total Hours of Risk Management. You can specify a value for each one of them, or you can click on the option to ask the system to use the cost and hours from the Tasks to Tackle Risk.

Associated Issues

As previously said risks can escalate to become an issue. In this section, you can create or select existing issues to associate with the risk.

Issues

Issues may come up as a result of a previously identified risk or be completely independent.

The anatomy of an issue is very similar to that of a risk: it includes a General section, Tasks Affected by the Issue, Tasks to Tackle Issue, and Associated Risks.

In the General section, the Issue Status is particularly relevant, since the information you will find on dashboards and reports will be classified between closed and non-closed issues.

Issue Resolution

This section is usually filled out when the issue has been closed. It includes a final resolution description that can be extended by adding documents.

Change in Project Cost will indicate the economic impact this issue had on the project. This figure can be typed manually or else you can click on the option to use the risk’s occurrence cost if there are any associated risks. The same goes for variations in schedule.

Dashboard

The project dashboard offers the following dashlets

Total cost of risk management

  • Type: Pie
  • Total: total cost of project + Total cost of risk management
  • 2 slices
  • Number (formatted) and percentage
  • Applies to all risks, open and closed

Total cost of issue management

  • Type: Pie
  • Total: total cost of project + Total cost of issue management
  • 2 slices
  • Number (formatted) and percentage
  • Applies to all issues, open and closed

Total schedule variation of risk occurrence

  • Type: Horizontal bars
  • Bar 1: Total duration of project
  • Bar 2: Total variation of project (+/-) Σ total durations of risk occurrence
  • Number (formatted) and percentage
  • Applies to non-resolved risks

Total cost of change for closed issues

  • Type: Pie
  • Total: Total cost of project + Total cost of change for closed-status issues
  • 2 slices
  • Number (formatted) and percentage
  • Applies to closed issues
  • Total schedule variation for closed issues

    • Type: Horizontal bars
    • Bar 1: total duration of project
    • Bar 2: total duration of project (+/-) Σ total durations of schedule change
    • Number (formatted) and percentage
    • Applies to closed issues

    Total cost of issues by type

    • Type: pie
    • Total: total cost of closed issues
    • As many slices as issue types
    • Number (formatted) and percentage
    • Applies to closed issues

Grant permissions to create baselines

Permissions to manage baselines

Users having Full Access or Project Manager license-based roles can create, set as active, and delete baselines.

By default, roles based on those licenses will have the permission granted. If you want to revoke or grant it again, go to ORGANIZATION, USER MANAGEMENT, Role Definition and select the role you wish to change.

Click on “Set manager permissions” and select or deselect “Manage baselines”

Project workflow

Project Workflow

Tutorial: Workflow configuration of project status.

In this tutorial, we will see how authorizations flows of status changes, or workflow, work.

What is the purpose of the project status workflow?

The workflow allows defining the flow of project status.

For example, we can define that projects whose status is “in draft” can only be changed to a “initiated” or “discarded” status with the approval of a member of the Technical Project Office of our organization.

Navigation: how to gain access to the configuration of status changes?

To navigate to the configuration of status changes, follow this route:

  • “Configuration” area (1)
  • “Parameters” drop-down (2)
  • “Project parameters” section (3)
  • “Project status” menu (4)

Note: To be able to edit the configuration of status changes, it is necessary to have the access permissions of a Full Access account.

Configuration method

There are four steps to define the flow from a given status:

1. Definition of status

The first step is that the organization to define what all the possible status of its projects are. ITM Platform customers carry out this step during the initial configuration of the environment.

Note: It is possible to select only one of those status as a predefined status, so that any new project starts with it.

Note: “Draft” and “closed” status are system status and cannot be deleted but their name can be edited to suit the peculiarities of each organization.

2. Enabling authorizations

In order to be able to customize the status flows, you must first enable the authorizations by clicking on the corresponding option.

3. Application of restrictions

To apply restrictions, it is necessary to select the origin status that you want to edit.

Next, the restrictions area applied in two steps:

c1) Selection of destination status

When working from a origin status, within each status tab you choose which are the possible destinations to which the project can be moved from that stating point. By default, all project status that have been created before will appear as possible destinations.

c2) Application of conditional rules

Then, it is possible (although not mandatory) to create rules that establish an authorization process for the project change.

This means that each time the project status changes from the origin status in which we are located and under the selected conditions, the new status will have to be authorized by the person or persons indicated.

To create and configure a new rule, three steps are followed:

  1. Create a new rule (1)
  2. Edit the rule to define additional conditions
    1. Filters (2)
    2. Authorizers (3)
    3. Logical model (4)

The conditions view allows you to set several filters:

4. Application for status change

Once the rules have been defined, project managers who wish to make a status change for which authorization is required, must submit an application.

The authorization request is processed directly from the general menu of the project, when editing the status fields.

On this screen, you can select the destination status, and add comments.

When saving the status, if the status change requires an authorization, the authorization status field will appear aspending”.

5. Issuance of authorizations

To authorize the change of status from the account of an authorizer, you have to go to “My authorizations” section in “My desktop” area.

From this list, it is enough to choose the project whose status change needs to be approved and click on the approval button.

Organizational units

Organizational units

The organizational units represent the internal structure of an organization and will help you define the working groups for your projects.

From the CONFIGURATION menu click on ORGANIZATION and the section Organization Units 1 to create a new unit 2:

Enter the Unit Name 3 as the only required detail you must provide. Next, associate the users who will belong to the unit.

Processes

ITM Platform can reflect organizational processes with the layout Value chain > Activity > Process. This layout is not required unless the organization is structured in this way.

More than one Value Chain can be defined, containing one or several Activities, and in turn for each activity the specific Processes into which the organizational structure is divided. With this structure projects can be assigned to the different processes, along with an analysis of how the activity of one department affects other processes of the organization.

From the menu ORGANIZATION, in the section Business Processes 1, add the value chain 2, and in turn the corresponding activities and processes.

Workgroups can link users together in a way which is different from the organizational structure. For example, a group could be “Enhancement Team” or “Evaluation Committee”.

Groups

From the CONFIGURATION menu go to the Work Groups section and add the group 1:

The Work Group Name 2 is the only required detail you must provide. You can then add the users who will belong to the group, along with additional information to help improve administration.

Users can belong to several work groups but only belong to one unit of the organizational structure.