Project team management
The Team tab of a project is where the project manager decides who works on the project and on which tasks. It is one grid: tasks are rows, team members are columns, and each cell where a task meets a member is an assignment. Services have the same tab, with activities instead of tasks.
From this single view you can:
- Add people to the team and set their project role: Project manager, Team member or Guest.
- Assign a member to a task with a task role, Manager or Member, and an estimated effort.
- See, for every assignment, the estimated effort, the time the member has reported and the accepted effort.
- Assign several tasks to several people in one action.
- Detect overallocations, open a member's day-by-day workload and redistribute estimated effort to other members.
- Undo and redo any change before saving.
Key concepts
- Project role: what a person is in the project as a whole. Only project managers and team members can be assigned to tasks. Guests stay on the project without task assignments and only see the General tab, the documents and the collaboration panel. See Licenses and roles.
- Task role: what a person does on one task. A task Manager can report progress on the task and edit it; a task Member reports time on it.
- Estimated, reported and accepted effort: the three figures shown in every assignment. See Effort management.
- Overallocation: on at least one day of the task period, the work distributed to the member across all their tasks in all projects exceeds that day's capacity.
To open the tab, go to MANAGEMENT > Projects, open the project and click Team. For services, go to MANAGEMENT > Services, open the service and click Team.
The Team tab at a glance
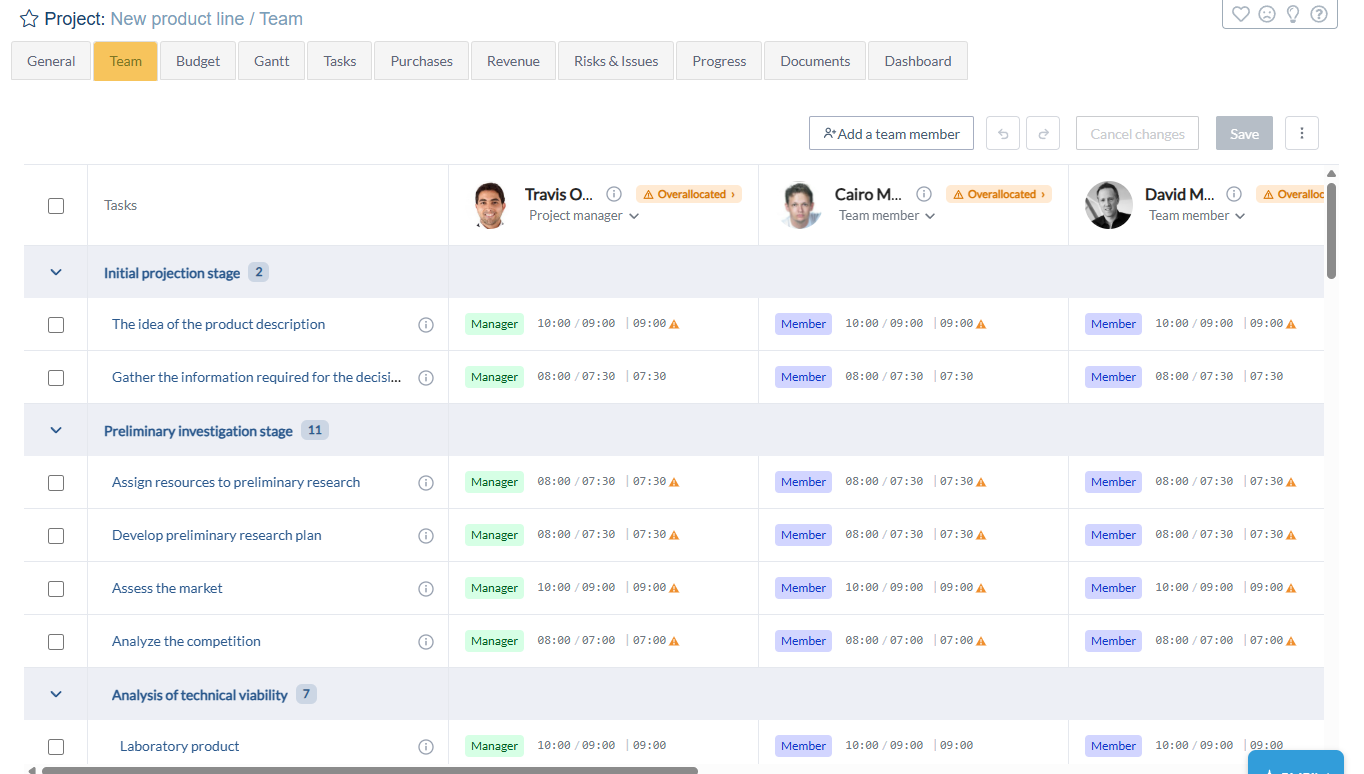
- Header actions: Add a team member, Undo and Redo, Cancel changes, Save, and a three-dot menu with view options. Save and Cancel changes stay disabled until something changes.
- Tasks column: tasks appear in the same order as in the Gantt chart. Summary tasks are shown as bands with the number of tasks they contain; click the chevron of a band to collapse or expand it. Summary tasks have no cells because they cannot be assigned. Each task row has a checkbox, used for bulk assignment, and an information icon.
- Member columns: one column per team member with photo or initials, name, an information icon, the project role with a chevron to change it, and an Overallocated badge when needed. Project managers come first, then team members, then guests. Guest columns are grayed out and have no cells.
- Cells: an assigned cell shows the task role badge followed by three figures,
estimated / reported | accepted. Hover a figure to see its name. Icons at the end of the cell flag a manually set accepted value (pencil), vacation days during the task period (umbrella) and an overallocation (orange triangle). Hovering an empty cell shows Assign a task. - The header and the Tasks column stay in place while you scroll, and one horizontal scrollbar moves the member columns.
Note: The grid is editable for users who can edit the project, typically its project managers and users with a Full Access license. Team members see the list of the team in read-only mode.
Switch between large and compact views
The Team tab opens in the large view the first time you use it. To fit more members and tasks on screen, open the three-dot menu in the header and select Compact view.
In the compact view, member columns and rows are narrower, and the headers show short project role labels such as Manager, Member and Guest. Full role names remain in the role menu and member details.
Adding people to the team
- Click Add a team member.
- In the Team - add people window, select the people to add. Use the search icon to search by name or login, or the filter icon to filter by name, login, category, position, department and provider. The checkbox in the header of the list selects everyone listed.
- Click Done. The people appear as new columns marked as pending changes.
- Click Save in the header.
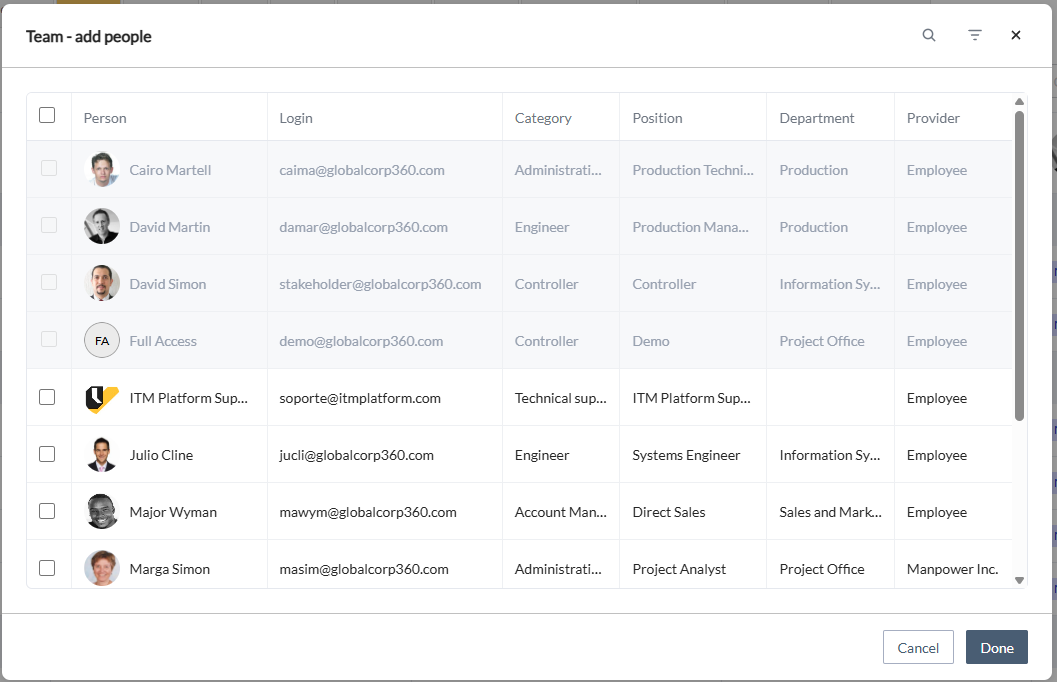
- People who are already on the team appear checked and grayed out. This window only adds people; to remove someone, use the project role menu.
- Only users who can hold a team role are listed: users with a Team Member license or with a manager license. Users without a license do not appear.
- A new member gets the Team member role by default, or Guest if their license does not allow team membership. Change the role afterward if needed.
- Adding someone to the team does not assign them to any task. Assign tasks afterward, cell by cell or in bulk.
Tip: You can also add a user to the project from the Resource planning section or from the Team section of a task.
Project roles
Click the chevron next to a member's role to open the role menu: Project manager, Team member, Guest and Delete member. The current role is highlighted.
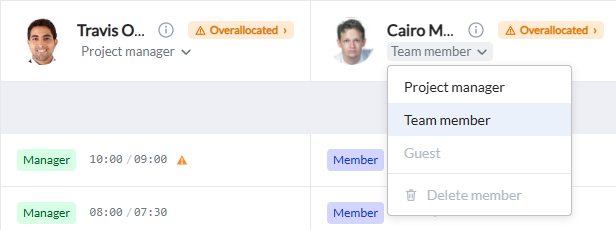
- Project manager requires a Project Manager or Full Access license. A project can have several project managers.
- Team member can be assigned to tasks and reports time on them.
- Guest stays on the project without task assignments. Converting an assigned member to Guest removes all their task assignments after confirmation, and switching them back to Team member does not restore those assignments.
- Delete member removes the person from the project after confirmation. If you delete yourself, a second warning reminds you that you may lose access to the project.
Options that are not possible are grayed out and show the reason when you hover them. A member cannot be converted to Guest or deleted while one of their assignments holds reported time or a manually accepted value, while they are the manager of a risk or an issue of the project, or when they do not have the license the role requires. Move or delete the time entries, reassign the risk or issue, or change the license first.
Role changes are pending until you click Save.
Assigning a task to a member
- Click the empty cell where the task row meets the member column.
- Choose the Task role: Manager or Member. Kanban projects only offer Member.
- Enter the Estimated time in hours and minutes. You can leave 0:00 and estimate later.
- Click Done, then Save in the header.
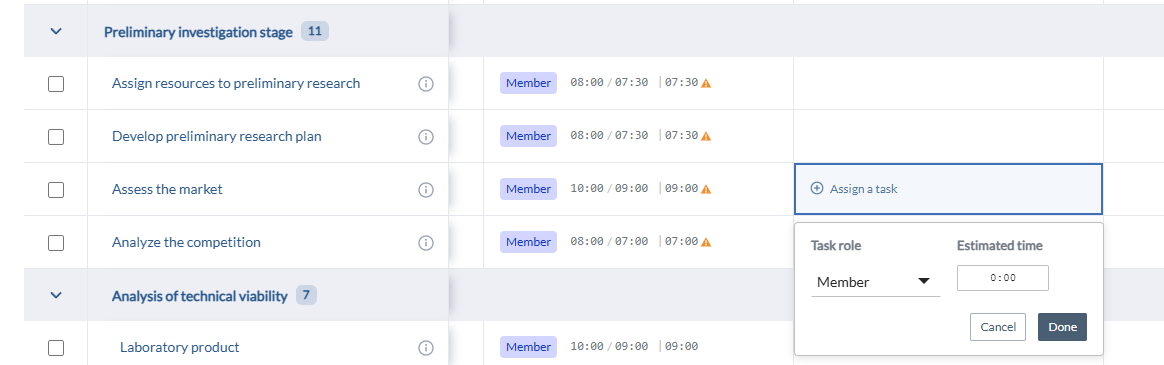
The cell now shows the role badge, green for a task manager and blue for a task member, followed by the effort figures. A person can be the task manager of some tasks and a member of others, whatever their project role.
To change an assignment, hover the cell and click its three-dot menu:
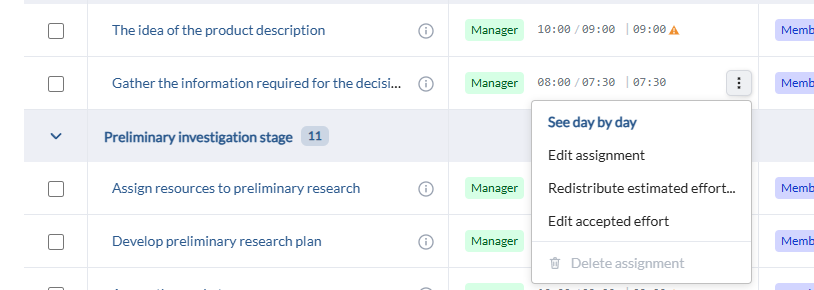
- Edit assignment reopens the same window to change the task role or the estimated time.
- Edit accepted effort and Reset to reported are described in the effort section below.
- See day by day and Redistribute estimated effort are described in the overallocation sections below.
- Delete assignment removes the member from the task. It is grayed out, with the reason on hover, when the assignment has reported time or a manually accepted value. Delete or move the time entries first.
You can also assign people to one task from the task's own Team section, and plan effort by professional category, before knowing who will do the work, from the task's Effort section. See Effort management.
Assigning several tasks at once
- Select the checkbox of each task to assign. The checkbox in the header of the Tasks column selects or clears all tasks; when only some tasks are selected it shows a partial state, and clicking it selects all.
- A bar with the number of selected tasks appears in the header. Click Assign to user/s.
- In the Assign tasks window, pick one or more members in Assign to. Guests are not listed, and members already assigned to every selected task cannot be picked.
- Choose the Task role and, optionally, the Estimated time to apply to every new assignment. If you picked at least two members, you can select Set role and time individually per assignment to enter a different role and time for each task and member, one tab per member.
- Check the preview line, for example "3 tasks × 2 members = 6 assignment cells · 6 new", and click Done.
- Click Save in the header.
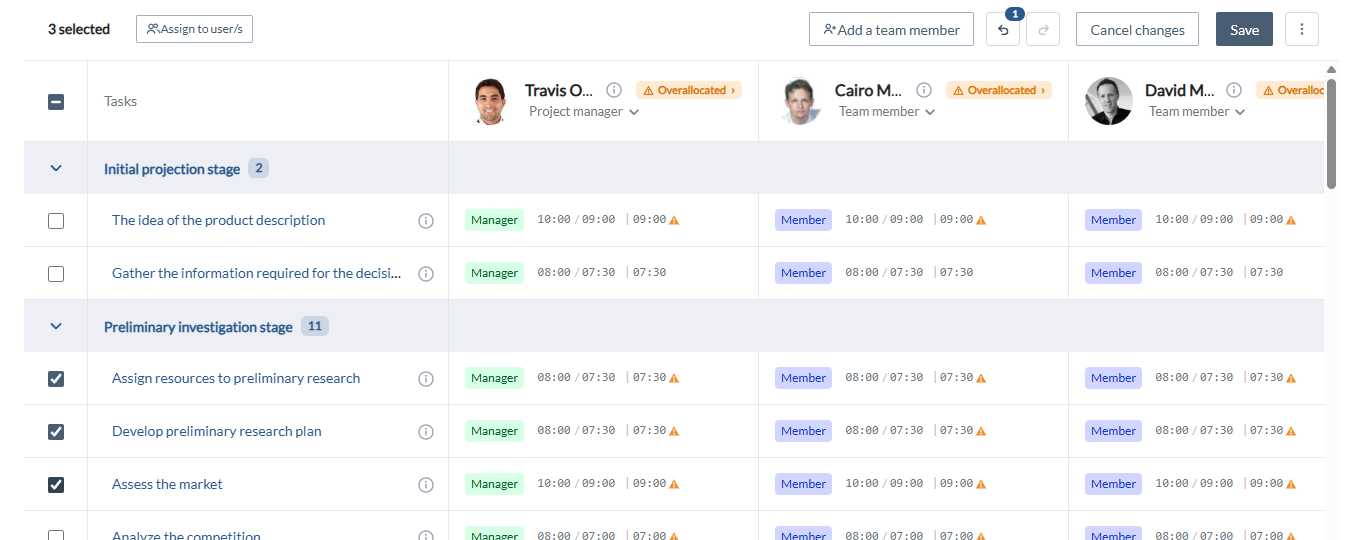
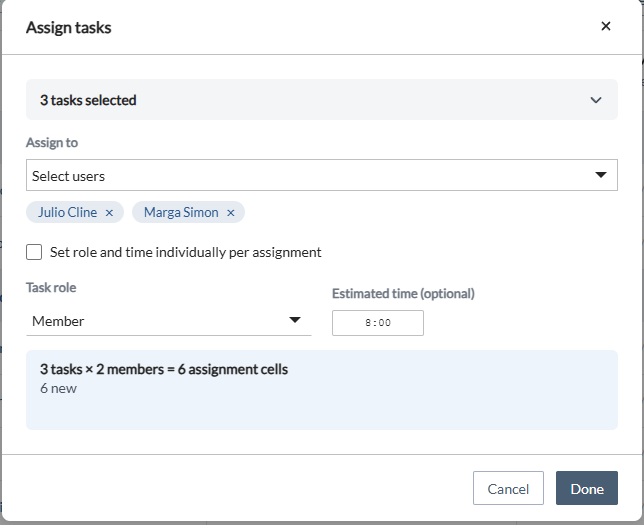
Bulk assignment only adds assignments. Task and member pairs that already exist are skipped and counted in the preview as "already assigned (skipped)", so existing roles and estimates are never overwritten. One bulk assignment is one step in the undo history: a single undo reverts all the assignments it created.
Estimated, reported and accepted effort
Each assignment shows three figures, estimated / reported | accepted:
- Estimated effort is the time the manager plans for the member on the task. Click the number to edit it in place, then press Enter or Tab to commit; Tab also opens the next assignment for editing, and Escape cancels. Values are rounded to the nearest 15 minutes, and a short "rounded" note appears when this happens. You can also change it with Edit assignment in the cell menu.
- Reported effort is the time the member has entered in the timesheet. It is read-only here.
- Accepted effort is the effort the project recognizes for costs. By default it mirrors the reported time and appears in gray. A value set by the manager appears in bold with a pencil icon.

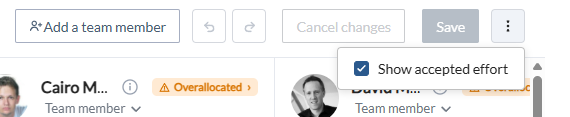
The accepted figure is hidden by default so that each cell shows fewer figures. It is shown automatically when the project already holds manually accepted values, and you can show or hide it at any time with Show accepted effort in the header three-dot menu. The choice is remembered in your browser.
To set an accepted value, open the cell menu and click Edit accepted effort. To return to the automatic value, empty the field or click Reset to reported in the cell menu; this item only appears while the cell holds a manual value. Accepted effort cannot be edited in services, nor once a Period End Close has been run for that period.
For the meaning and use of each effort type, see Effort management.
Saving, undoing and canceling changes
Nothing you do in the grid is saved until you click Save in the header. Pending changes are marked with a small amber dot in the corner of the cell or of the member header, and Save and Cancel changes become active. Windows such as the assignment window, Assign tasks and Team - add people close with Done because they only prepare changes.
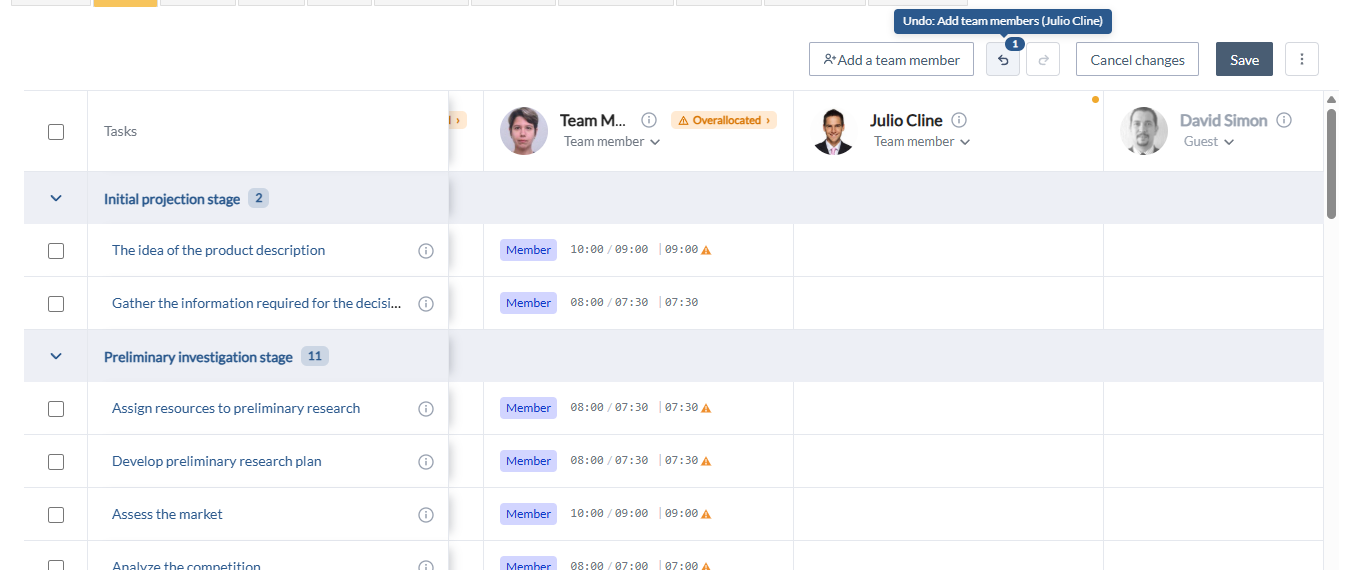
- Undo and Redo, or Ctrl+Z and Ctrl+Y, step through your unsaved changes one at a time. Hover the buttons to see which change the next step reverts; the badge shows how many steps are available. One action is one step: a bulk assignment, a redistribution, adding several people or converting a member to Guest are each reverted with a single undo.
- Cancel changes discards every pending change.
- Save persists all pending changes at once and clears the undo history. If the server rejects a change, for example because a user cannot hold the role, a message explains it and the affected cells keep their pending mark.
- If you leave the tab with unsaved changes, the application asks you to confirm.
Availability and overallocation
Availability signals appear when your project role includes the availability permission, which the administrator sets in the role definition. They are computed automatically when the tab loads.
A member is overallocated on a task when, on at least one day of the task period, the work distributed to that member across all their tasks in all projects exceeds their capacity for that day. Capacity comes from the member's working hours and calendar, including their vacations.

- An orange triangle in the cell marks each overallocated assignment. Hover it to see the first overallocated day, the total allocated that day split between this project and other projects, the daily capacity and how many days of the task period are overallocated. Other projects are only counted, never named, so a project manager sees how much of the problem belongs to their project without gaining access to other projects.
- An Overallocated badge next to the member's name shows that at least one of their assignments in this project is overallocated.
- The same figures appear at the top of the cell menu, above the actions that resolve the overallocation.
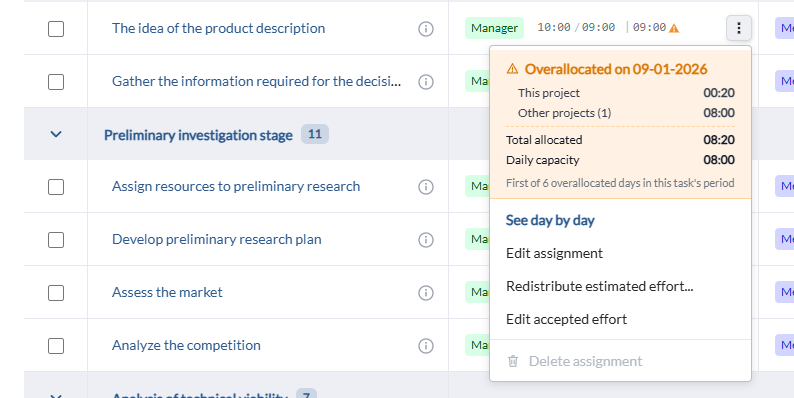
- When you enter an estimate that exceeds the member's capacity for the task period, an outlined triangle appears immediately as a provisional warning. The exact day-by-day check runs after you save, and the signal updates by itself, usually within a couple of minutes.
- An umbrella icon means that the member has vacation days during the task period. Hover it to see the dates.
Note: An assignment estimated at 0:00 can still show the triangle. The overallocation then comes from the member's other work during the task period, and the tooltip says so.
Overallocation signals exist in projects only. Services do not show them.
Day-by-day workload
To understand an overallocation, open the Daily workload panel:
- Click the orange triangle in a cell, or See day by day in any assignment's cell menu, to see the task period.
- Click the Overallocated badge, or See day by day in the member details panel, to see the whole span of the member's assignments in this project.
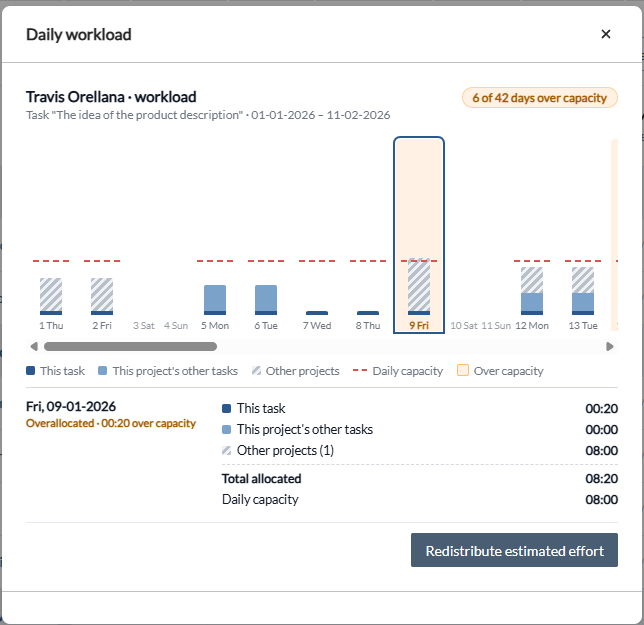
Each bar is a calendar day. It stacks the effort of this task, the other tasks of this project and, hatched, other projects, against the dashed daily capacity line. Days over capacity are tinted, non-working days and vacations are marked, and the summary counts the days over capacity. Click a day to read its exact figures. Spans longer than 92 days show the 92 days around today. In the task view, the Redistribute estimated effort button opens the dialog described next.
Redistributing estimated effort
When a member has more work than capacity, you can move part of their estimated effort on a task to other team members without leaving the grid. Open the cell menu and click Redistribute estimated effort, or use the button in the Daily workload panel.
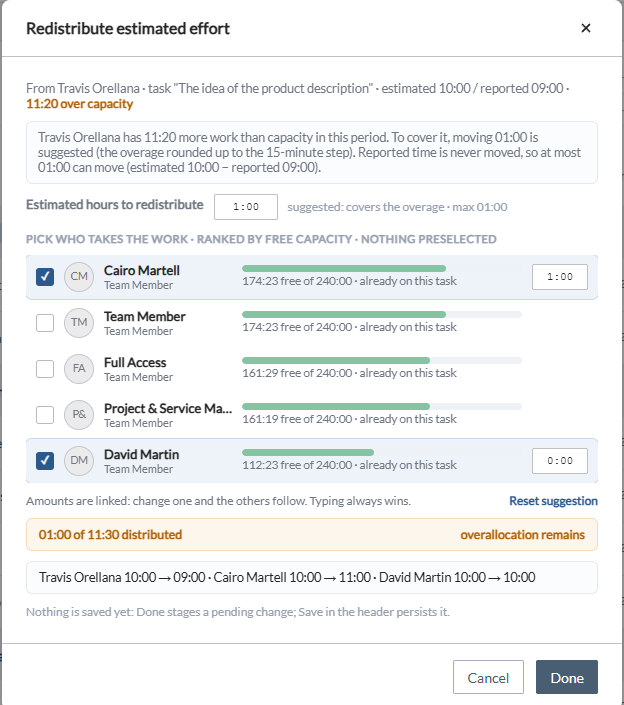
- The header summarizes the situation: the member's estimated and reported time on the task and the hours over capacity in the task period.
- Estimated hours to redistribute is pre-filled with the amount needed to cover the overallocation, rounded up to 15 minutes and limited by the reported time: the member's estimate can never go below what they have already reported. Change it to move more or less.
- Pick who takes the work. Members are ranked by their free capacity in the task period, and nobody is preselected because only you know who has the skills. Members who are not on the task yet are added to it as task members. Guests are not listed. A member who would end up over capacity is flagged, but you can still choose them.
- Adjust the amounts if needed. Amounts are linked: change one and the others follow so that the total stays the same. An amount you type is locked and shows a lock icon; the other amounts adapt. Reset suggestion restores the automatic split. The status line tells you whether the overallocation is covered.
- Click Done. The changes appear in the grid as pending cells, a single undo reverts the whole redistribution, and Save persists it.
Only estimated effort moves. Reported time and accepted effort never move. Redistribution is not available in services.
Member and task details
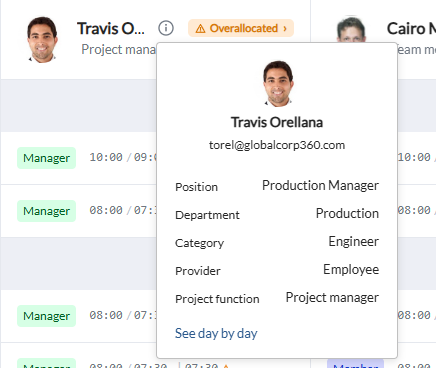
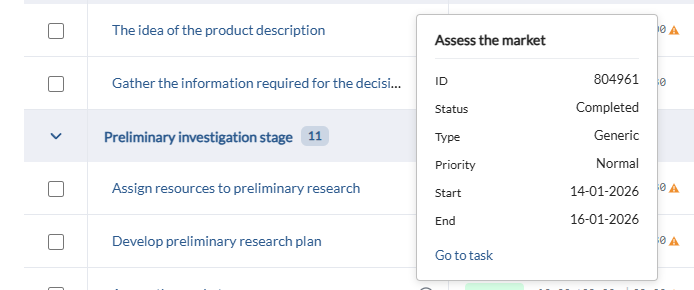
Click the information icon next to a member's name to see their email, position, department, category, provider and project function, plus a link to their day-by-day workload. Click the information icon of a task to see its ID, status, type, priority, start and end dates, and a Go to task link.
Teams in services
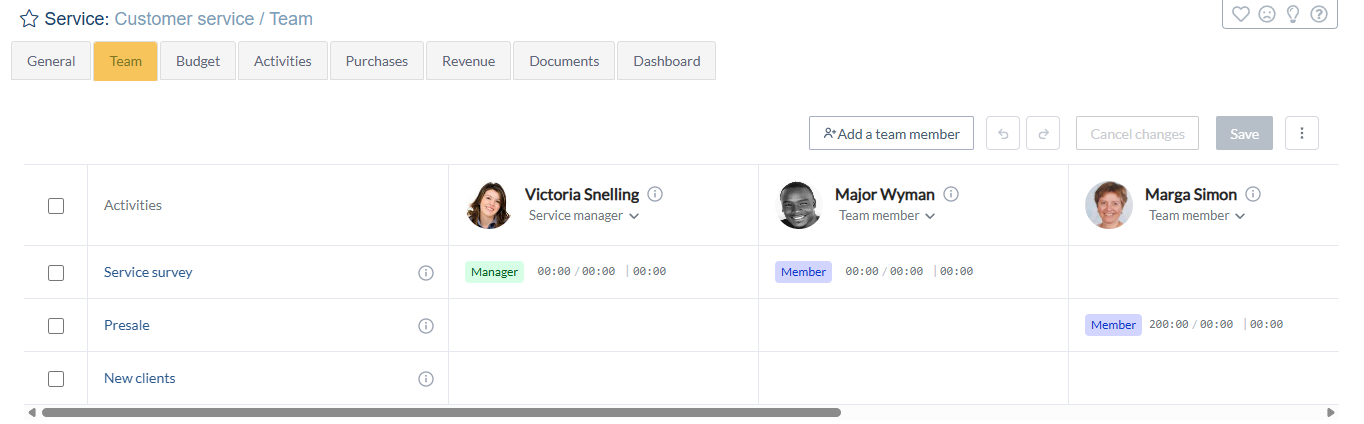
The Team tab of a service works the same way, with activities instead of tasks: activity rows, the Service manager, Team member and Guest roles, and Manager or Member activity roles with estimated effort. Two differences:
- Accepted effort always equals reported time in services and cannot be edited here.
- Services have no capacity signals: no overallocation triangles or badges, no day-by-day panel and no redistribution.
Team of a task in the Kanban board
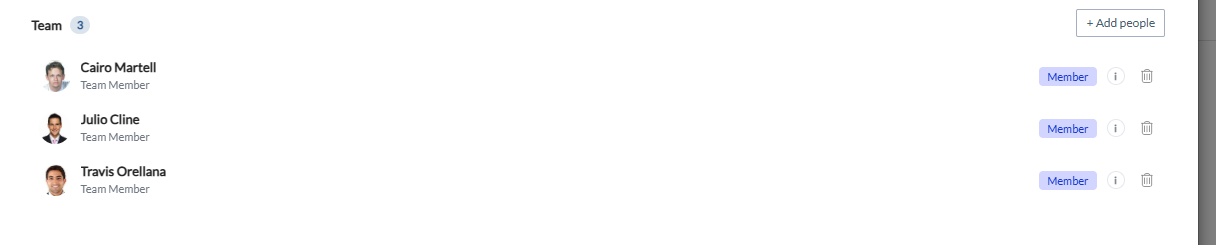
In Kanban projects, the task window that opens from the Board also has a Team section. It lists the members of the task; click + Add people to add project members, with the same search and filters as the Team tab, and the trash icon to remove one. The changes are saved with the task window's Save button. Kanban tasks have no task manager, so every member has the Member role. The same section appears in the window of the action tasks of risks and issues. Users who can only view the board see the team in read-only mode.
FAQ
Why can't I delete an assignment or convert a member to Guest? The assignment holds reported time or a manually accepted value, the member is the manager of a risk or an issue, or the member lacks the license the role requires. The grayed-out option shows the reason when you hover it.
Why does an assignment with 0:00 estimated effort show an overallocation? The overallocation comes from the member's other tasks, in this project or in others, during the task period. Open the day-by-day panel to see the split.
Why does the overallocation mark not change right after I save? The exact day-by-day check runs on the server after the save. The provisional outlined triangle tells you that the check is running, and the cell updates by itself, usually within a couple of minutes.
Where can I see overallocations across all projects? In the Resources section, if your role has access to it: Weekly workload shows each person day by day, Resource analysis over several periods, and Resource planning by professional category. Project managers see the teams of their projects there, with work on other projects as an unnamed total. See Resources section. From the Team tab, other projects are only shown as a count and a total.
Why is the accepted effort not visible in the cells? It is hidden by default. Enable Show accepted effort in the header three-dot menu.